NEW!
CSHTML5 has now become OpenSilver!
We are happy to announce that CSHTML5 has been significantly improved and rebranded
to 'OpenSilver', which stands for 'Open-source reimplementation of Silverlight'. It is fully backward compatible and it can be downloaded from
OpenSilver.net. Upgrading from
CSHTML5 to OpenSilver is very easy.
Read the FAQ

The HtmlPresenter control lets you easily embed custom HTML/CSS code inside your XAML, or create new custom controls using HTML code. The HTML code is inserted "as is" in the page. The CSS code is automatically merged to the page Header.
HtmlPresenter1.Html = "<p>This is native HTML code</p>";
    <native:HtmlPresenter xmlns:native="using:CSHTML5.Native.Html.Controls" xmlns:mc="http://schemas.openxmlformats.org/markup-compatibility/2006" mc:Ignorable="native">
        <p>This is native HTML code</p>
    </native:HtmlPresenter>
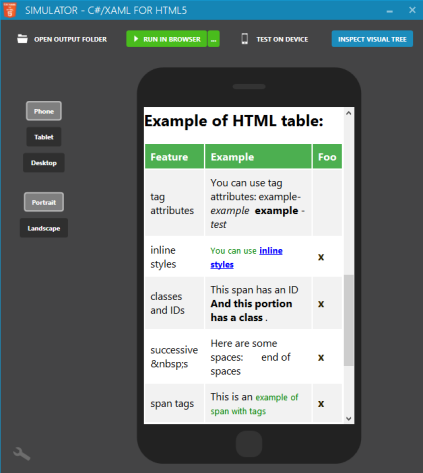
<Page x:Class="Application1.MainPage" xmlns="http://schemas.microsoft.com/winfx/2006/xaml/presentation" xmlns:x="http://schemas.microsoft.com/winfx/2006/xaml"> <ScrollViewer Background="White" VerticalScrollBarVisibility="Auto" HorizontalScrollBarVisibility="Auto"> <native:HtmlPresenter xmlns:native="using:CSHTML5.Native.Html.Controls" xmlns:mc="http://schemas.openxmlformats.org/markup-compatibility/2006" mc:Ignorable="native"> <style type='text/css'> .sampleTable table { border-collapse: collapse; width: 100%; background-color: #ffffff } .sampleTable th, .sampleTable td { text-align: left; padding: 8px; } .sampleTable tr:nth-child(even){background-color: #f2f2f2} .sampleTable th { background-color: #4CAF50; color: white; } </style> <h1>HTML Example</h1> <p>This is an example of formatted text: <strong>Pellentesque habitant morbi tristique</strong> senectus et <em>aenean ultricies mi vitae est</em> netus et <code>commodo vitae</code> , malesuada fames ac turpis egestas. <a href="#">Donec non enim</a> in turpis pulvinar facilisis. Ut felis. </p> <h2>This is header Level 2</h2> <ol> <li>This is an item in an ordered list</li> <li>This is another item in an ordered list</li> </ol> <blockquote> <p>This is a blockquote: Lorem ipsum dolor sit amet, consectetur adipiscing elit. Vivamus magna. Cras in mi at felis aliquet congue. Ut a est eget ligula molestie gravida.</p> </blockquote> <h3>This is header Level 3</h3> <ul> <li>This is an item in an unordered list</li> <li>This is another item in an unordered list</li> </ul> <h2>Example of HTML form:</h2> <form action="#" method="post"> <div> <label for="name">Text Input:</label> <input id="name" tabindex="1" name="name" type="text" value="" /> </div> <div> <p>Radio Button Choice: <label for="radio-choice-1">Choice 1</label> <input id="radio-choice-1" tabindex="2" name="radio-choice-1" type="radio" value="choice-1" /> <label for="radio-choice-2">Choice 2</label> <input id="radio-choice-2" tabindex="3" name="radio-choice-2" type="radio" value="choice-2" /> </p> </div> <div> <label for="select-choice">Select Dropdown Choice:</label> <select id="select-choice" name="select-choice"> <option value="Choice 1">Choice 1</option> <option value="Choice 2">Choice 2</option> <option value="Choice 3">Choice 3</option> </select> </div> <div> <label for="checkbox">Checkbox:</label> <input id="checkbox" name="checkbox" type="checkbox" /> </div> </form> <h2>Example of HTML table:</h2> <table class="sampleTable"> <tr> <th>Feature</th> <th>Example</th> <th>Foo</th> </tr> <tr> <td>tag attributes</td> <td>You can use tag attributes: example- <em>example </em> <strong>example</strong> - <em>test</em> </td> <td> </td> </tr> <tr> <td>inline styles</td> <td> <span style="color: green; font-size: 13px;">You can use <strong style="color: blue; text-decoration: underline;">inline styles</strong> </span> </td> <td> <strong style="font-size: 17px; color: #2b2301;">x</strong> </td> </tr> <tr> <td>classes and IDs</td> <td> <span id="demoId">This span has an ID <strong class="demoClass">And this portion has a class</strong> . </span> </td> <td> <strong style="font-size: 17px; color: #2b2301;">x</strong> </td> </tr> <tr> <td>successive &nbsp;s</td> <td>Here are some spaces: end of spaces</td> <td> <strong style="font-size: 17px; color: #2b2301;">x</strong> </td> </tr> <tr> <td>span tags</td> <td>This is an <span style="color: green; font-size: 13px;">example of span with tags</span> </td> <td> <strong style="font-size: 17px; color: #2b2301;">x</strong> </td> </tr> <tr> <td>links</td> <td> <a href="http://www.cshtml5.com">This is</a> an example of link. </td> <td> </td> </tr> <tr> <td>comments</td> <td>After this text there is a comment that is only visible by looking at the source <!-- This is a comment! --> </td> <td> <strong style="font-size: 17px; color: #2b2301;">x</strong> </td> </tr> <tr> <td>Encoding special characters</td> <td> <span style="color: red; font-size: 17px;">♥</span> <strong style="font-size: 20px;">? ?</strong> >< </td> <td> <strong style="font-size: 17px; color: #2b2301;">x</strong> </td> </tr> </table> </native:HtmlPresenter> </ScrollViewer> </Page>
Here is a screenshot of the result:
using CSHTML5;
using CSHTML5.Native.Html.Controls;
using System;

namespace TestNumericTextBox
{
    public class NumericTextBox : HtmlPresenter
    {
        private int _value = 0;

        public NumericTextBox()
        {
            this.Html = @"<input type=""number"" pattern=""[0-9]*"">";

            this.Loaded += NumericTextBox_Loaded;
        }

        public int Value
        {
            get
            {
                if (this.DomElement != null) //Note: the DOM element is null if the control has not been added to the visual tree yet.
                {
                    int valueInt;
                    string valueString = Interop.ExecuteJavaScript("$0.value", this.DomElement).ToString();
                    if (Int32.TryParse(valueString, out valueInt))
                    {
                        _value = valueInt;
                    }
                }
                return _value;
            }
            set
            {
                _value = value;

                if (this.DomElement != null) //Note: the DOM element is null if the control has not been added to the visual tree yet.
                    Interop.ExecuteJavaScript("$0.value = $1", this.DomElement, _value);
            }
        }

        void NumericTextBox_Loaded(object sender, Windows.UI.Xaml.RoutedEventArgs e)
        {
            // Here, the control has been added to the visual tree, so the DOM element exists. We set the initial value:
            Interop.ExecuteJavaScript("$0.value = $1", this.DomElement, _value);
        }
    }
}
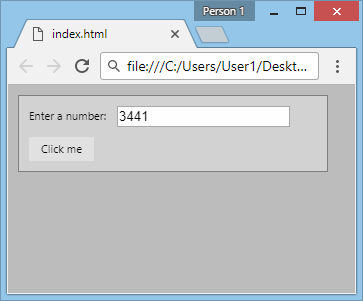
<Page
    x:Class="Application1.MainPage"
    xmlns="http://schemas.microsoft.com/winfx/2006/xaml/presentation"
    xmlns:x="http://schemas.microsoft.com/winfx/2006/xaml"
    xmlns:controlns="using:TestNumericTextBox">
    <Border Margin="10" Padding="10" BorderThickness="1" BorderBrush="Gray" Background="LightGray" HorizontalAlignment="Left" VerticalAlignment="Top">
        <StackPanel>
            <StackPanel Orientation="Horizontal" HorizontalAlignment="Left">
                <TextBlock Text="Enter a number:" VerticalAlignment="Center"/>
                <controlns:NumericTextBox x:Name="NumericTextBox1" Value="100" Margin="10,0,0,0" Width="200" VerticalAlignment="Center"/>
            </StackPanel>
            <Button Content="Click me" Click="Button_Click" Margin="0,10,0,0" HorizontalAlignment="Left"/>
        </StackPanel>
    </Border>
</Page>
using System.Windows;
using Windows.UI.Xaml;
using Windows.UI.Xaml.Controls;

namespace Application1
{
    public partial class MainPage : Page
    {
        public MainPage()
        {
            this.InitializeComponent();

            // Enter construction logic here...
        }

        private void Button_Click(object sender, RoutedEventArgs e)
        {
            MessageBox.Show("The value is: " + NumericTextBox1.Value.ToString());
        }
    }
}
Here is a screenshot of the result:
Please click here for contact information.
 follow us on
twitter
follow us on
twitter
 find us on
facebook
find us on
facebook
 be active on the
forums
be active on the
forums
 view source on
GitHub
view source on
GitHub